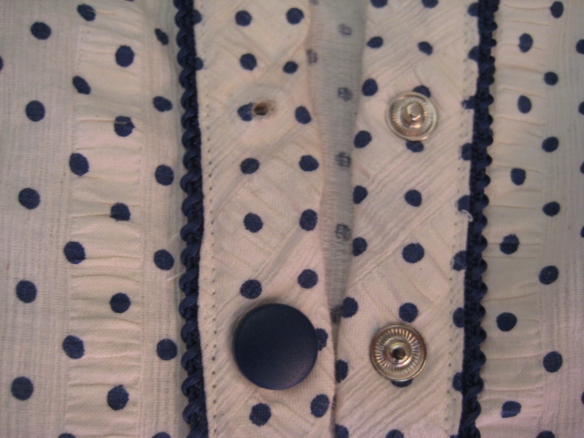
I forgot to share the photo of the various stages of buttons and studs for my latest top. Remember that my initial thought was to sew horizontal button holes onto the shirt but the band was too narrow for the size of buttons I’d bought so I thought I’d try these press studs which would be quick and easy to attach!! Ha ha, what a dreamer I can be!! LOL
Here you can see what the finished press stud was meant to look like (as a button) on the bottom left and the hole (above it) that I had to punch before I could attach the button stud. The problems I had with these studs were related to the fact that the studs were meant for an anorak or jacket, but the sales lady said they should be OK… she was wrong!! The buttons didn’t align and when I hit them with a hammer the internals got damaged and wouldn’t click together anymore. I sat on the floor with tears rolling down my cheeks at this point coz I’d spent all that time sewing the garment together only to find that I may have butchered it completely. I returned to the shop where I bought them and the manager there had a go at fixing one on and you’d never believe it, but she managed to butcher it too!! Ha ha, what a relief to find out that it wasn’t necessarily my fault. We played around a little longer until I felt comfortable with the correct procedure and she gave me a whole new pack of 12 button studs to go home and work with. Thank you! :) So I got home, pulled out the pliers and undid all the buttons to start again.
I had to unpick the band and add a bit more bulk in the middle so the button/stud could grip onto something thicker and for this I used 4 small square calico pieces, slightly larger than the button. And tried again! And failed again! Haha! This was getting me down. :( The buttons and studs all looked a lot better but only 3 of them clicked together and the rest stayed unfastened – not a good look, believe me!
I decided to take my blouse to Lincraft and ask one of my favorite ladies for help and her first comment was “I think the studs are too heavy”. Yep, I agreed but didn’t care coz all I wanted to do was wear my new top to work!! She showed me the buttons and button holes on her shirt and explained why button holes need to be vertical on a shirt instead of horizontal (apparently buttons come undone easier with horizontal button holes… who’d have thought! ?? LOL) Ok, she’d convinced me and I raced home, pulled out the pliers yet again and had to carefully try to work around those punched holes and make the front band strong and sturdy again and able to hold standard buttons. I unpicked the bands one more time to remove the bulk of calico and place a single new piece of calico inside as extra strength for the zigzagging and made 8 lovely button holes using my automatic buttonhole foot (what a lovely foot that is!). Zigzagged the holes closed on the other band and sewed my buttons on and the end result is lovely and unnoticeable to the untrained eye! Here’s the finished result:
If you look closely you may be able to see the patch of zig zag stitching underneath the buttons… a minor thing considering when the shirt is buttoned up no one will know. And I trust that none of you will give away my secret!
So the lesson for last week was that buttonholes down the front of a shirt/blouse should be vertical. Got that? I know I’ll never make that mistake again.
Happy sewing everyone!
PS: Quick question: am I the only one who sheds tears when things go wrong? I feel like such a girl sometimes! LOL


I would have cried also…believe me. :) I am glad that you were able to resolve it…it looks so pretty. m.
I’ve shed some tears. Don’t feel bad.
Oh no, you’re not the only one. The only thing I’ve cried more over are my children ;-)
Thanks, it’s nice to know I’m not the only one! LOL