The button dilemma

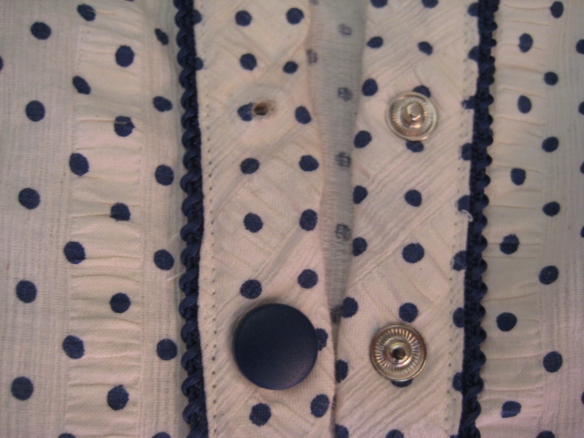
I forgot to share the photo of the various stages of buttons and studs for my latest top. Remember that my initial thought was to sew horizontal button holes onto the shirt but the band was too narrow for the size of buttons I’d bought so I thought I’d try these press studs which would be quick and easy to attach!! Ha ha, what a dreamer I can be!! LOL

Dreaded press stud buttons

Here you can see what the finished press stud was meant to look like (as a button) on the bottom left and the hole (above it) that I had to punch before I could attach the button stud. The problems I had with these studs were related to the fact that the studs were meant for an anorak or jacket, but the sales lady said they should be OK… she was wrong!! The buttons didn’t align and when I hit them with a hammer the internals got damaged and wouldn’t click together anymore. I sat on the floor with tears rolling down my cheeks at this point coz I’d spent all that time sewing the garment together only to find that I may have butchered it completely. I returned to the shop where I bought them and the manager there had a go at fixing one on and you’d never believe it, but she managed to butcher it too!! Ha ha, what a relief to find out that it wasn’t necessarily my fault. We played around a little longer until I felt comfortable with the correct procedure and she gave me a whole new pack of 12 button studs to go home and work with. Thank you! :) So I got home, pulled out the pliers and undid all the buttons to start again.

I had to unpick the band and add a bit more bulk in the middle so the button/stud could grip onto something thicker and for this I used 4 small square calico pieces, slightly larger than the button. And tried again! And failed again! Haha! This was getting me down. :( The buttons and studs all looked a lot better but only 3 of them clicked together and the rest stayed unfastened – not a good look, believe me!

I decided to take my blouse to Lincraft and ask one of my favorite ladies for help and her first comment was “I think the studs are too heavy”. Yep, I agreed but didn’t care coz all I wanted to do was wear my new top to work!! She showed me the buttons and button holes on her shirt and explained why button holes need to be vertical on a shirt instead of horizontal (apparently buttons come undone easier with horizontal button holes… who’d have thought! ?? LOL) Ok, she’d convinced me and I raced home, pulled out the pliers yet again and had to carefully try to work around those punched holes and make the front band strong and sturdy again and able to hold standard buttons. I unpicked the bands one more time to remove the bulk of calico and place a single new piece of calico inside as extra strength for the zigzagging and made 8 lovely button holes using my automatic buttonhole foot (what a lovely foot that is!). Zigzagged the holes closed on the other band and sewed my buttons on and the end result is lovely and unnoticeable to the untrained eye! Here’s the finished result:

vertical button holes + traditional buttons = a happy sewist!


If you look closely you may be able to see the patch of zig zag stitching underneath the buttons… a minor thing considering when the shirt is buttoned up no one will know. And I trust that none of you will give away my secret!

So the lesson for last week was that buttonholes down the front of a shirt/blouse should be vertical. Got that? I know I’ll never make that mistake again.

Happy sewing everyone!

PS: Quick question: am I the only one who sheds tears when things go wrong? I feel like such a girl sometimes! LOL

A couple of new creations

It’s been a long week but I’ve finally finished those two tops that were giving me grief. I spent the bulk of the weekend working on my work shirt and I’m looking forward to wearing it to job interviews and office related jobs but I do need to make a skirt first! I spent this afternoon sitting out in the sunshine sewing buttons onto the shirt and here’s a photo as proof:

Wearing a new cowl neck top, sewing buttons onto another new top…

As you can see, I’m wearing my new green cowl neck top today too!! This one was made of stretch bamboo and was a nightmare to hem no matter which stitch or needle I tried. I even tried the twin needle and eventually gave up before calling my Bernina dealer for help. She suggested treating the fabric by using hemming tape that acted like a glue and stiffened the hemline enough to be able to sew it. Voila!! It worked! I think the fit is slightly too tight across the bust but maybe by the third top, I’ll have it all worked out!! LOL

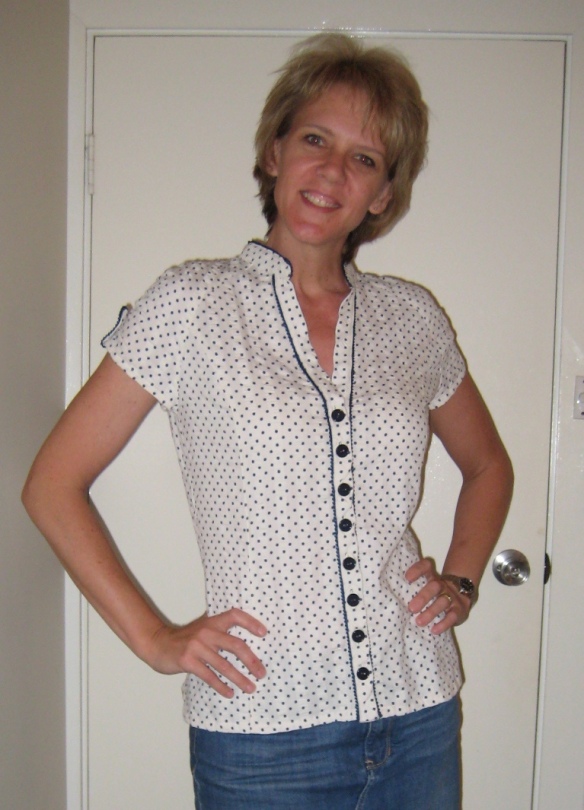
Back to my shirt/blouse (is there an actual difference?)… It’s a Vogue pattern (V1260) and wasn’t particularly hard to make but I had a lot of trouble with the buttons. Tried horizontal button holes that didn’t fit so opted for press stud style buttons that were meant for an anorak or jacket and were therefore too heavy for the garment plus I had a terrible time attaching them so in the end they all came off and I went with vertical button holes and traditional buttons and I’m over the moon now. Who’d have thought that button holes down the front of a shirt are actually MEANT to be vertical?? Doh!! I learnt something today and that makes me smile! :)

Here’s the finished result:

Tadaaa!!

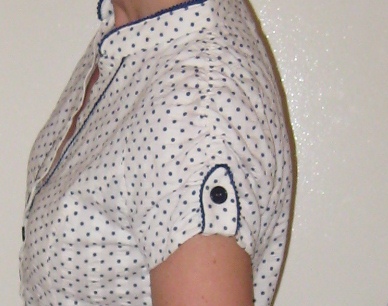
side-back view


Not sure if you can see the detail properly here but the sleeves have a lovely rouched/gathered effect on top of the shoulder (created with elastic) and I also love the buttoned tab!

All up, I’m happy with both tops. Next time I make a blouse (or a dress) I will lower the bust point as well as lowering the waist to get an even better fit which will be a whole new lesson in itself.

Plans for the up and coming week? Well, I’d like to make another pair of Thurlow shorts as well as try out a 3/4 length version too. I also need to draft a skirt block so I can create some skirt patterns… is anyone interested in seeing how I do this? It’s not hard to do with a skirt and I won’t ever have to buy a skirt pattern in my life. The sky is the limit!! :) Not sure how I’m going to fit all this in considering I’ll be working 4 days this week, but it’s nice to dream…

Enjoy your week!

Clear out the old…

So I dragged my 17 year old son out of bed at noon and got him involved in cleaning the house and boy, does it sparkle! All my kitchen cabinet fronts are clean of finger prints (“why do we have to bother cleaning this, Mum? No-one notices it!”), all surfaces are dust free (“didn’t you do this last week, Mum?”), the floors are vacuumed (“gosh, Bella leaves a lot of hair around, Mum”) and mopped, plus we got a couple of loads of washing on the line (“and don’t forget to flick the washing to semi iron it before you hang it… it may prevent the need for ironing it later, son!!”). All up, I think it was a successful two hours of boy-training (creating the perfect husband for some other woman!!) and I feel so much better that the house is now tidy and I can breathe again.

Here’s where I sew and I know it’s not ideal but it’s at the centre of the house amongst my family and I can watch TV and movies from my seat behind the sewing machine! (and take note of how tidy it is at the moment!) On Saturdays my mum comes over and her sewing machine gets added to the table and we sew together. Sometimes the kids pull their laptops up at the table and I love chatting away to them while I sew. Oh look, there’s my husband watching telly!

Anyway, while I was cleaning the house I decided that my wardrobe needed attention and I pulled all my clothes out onto my bed. I looked at each item and had to decide whether it was to go or stay. Did I love it? If not, why not? Could I fix what I hated about it? Did it flatter me? Did I feel good when I wore it? Did I receive compliments when I wore it? When was the last time I wore it? Does it suit my life style? (funny, today I read a blog about whether we were sewing for our lifestyle or for a lifestyle we are dreaming of? What an interesting thought! ie: do I sew evening wear even though I never go out at night?). Going through my ready-to-wear wardrobe made me feel so annoyed that I’d been wasting all that money on ill fitting clothing for all those years and some of the items that I put into the charity box were brand new!! (shhhhhh, don’t let my husband know). Why did I buy those pants that just don’t sit right? Yes, they were half price from $150 but they still don’t look any better!! Grrrrr!! Out they go! Along with 2 bags FULL of stuff I can’t be bothered weighing myself down with anymore.

I feel so much better now. I had to go through the process of clearing out the old to make room for the new and looking at my current wardrobe that’s quite bare, I’m now more motivated than ever to make myself clothing that will suit my lifestyle, flatter my body shape and save me money. Being six foot tall doesn’t have to be a burden anymore. I will learn how to alter my clothes correctly, slowly but surely and by 19 October, 2013 I will have a lovely wardrobe full of well made garments that I’ll be proud to say “hey, I made that!”

I think I’m ready to head back to my sewing zone to unpick my errors and try to complete the two tops that I had put on hold. Or maybe I should finish a couple of aprons that were ordered a few weeks ago (or was it months?? OMG, i don’t feel like sewing aprons anymore now that I have a wardrobe to create!!)

Oh, wow, almost forgot to tell you that while I was sorting through all the old clothes some money fell out of a pocket… SEVENTY DOLLARS!!! oh wow, oh wow, oh wow!! And guess where I might spend that money?? Yep, at the fabric or pattern store! Well, wouldn’t you?? ;-)

A flat day…

I’m having a flat day and nothing I sew is going right. Remember me saying that I would make the next cowl neck top smaller? Well, i reduced the pattern by one size and have almost finished sewing it up out of green stretch bamboo and it really is a bit tight across the bust now and I’ve had to put it aside to save my sanity. Will decide later if I want to finish it.

So I started on a polka dot shirt that I thought would be good for work. OMG, what was I thinking when I tried to take a short cut and NOT make a muslin first!! I added the usual lengthening adjustments but the fit just isn’t working. Grrrrr!!

Going to clean my house now and hopefully feel better after that.

Oh wow, oh wow, oh wow!

I’ve been busy and I’ve had success! My Thurlow pants are a success and I love the fit of these shorts and am glad that I didn’t give up and instead made 3 or 4 muslins to perfect the fit. Not only did I lengthen the crotch length but I also altered the “centre” point where the front joins the back “under the crotch”!! I have tried to research this topic and can’t seem to find any hard and fast rules about the “correct” spot to have the “centre” so if anyone knows of any “rules” for this topic, please share with me. I’m considering adding a new page to my blog giving a tutorial on how I made the alterations that I used to get the perfect fit for me. Are there other people out there who are interested in seeing the various alterations I made to get to this stage? Who knows… it might help others too.

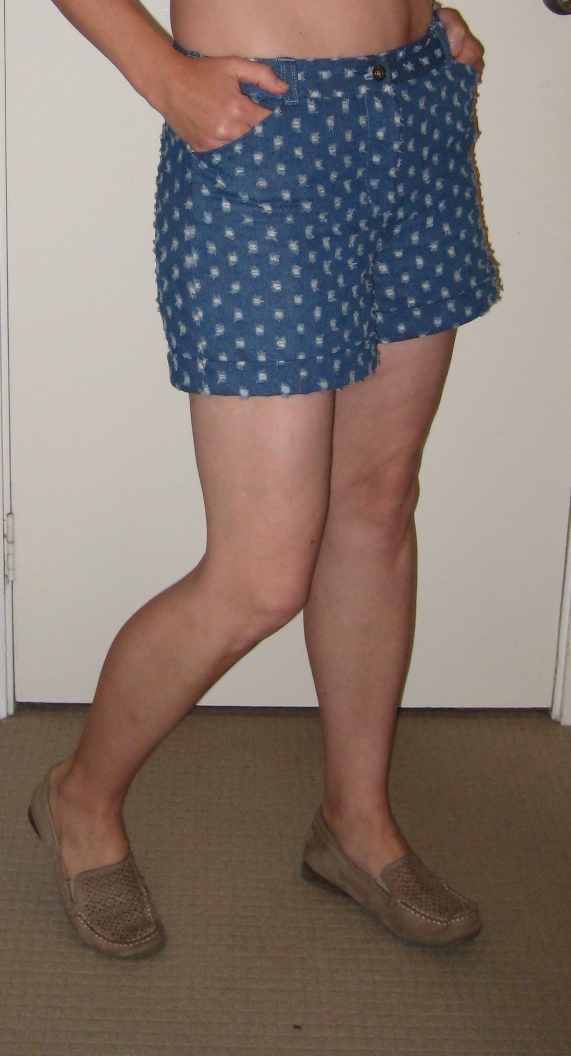
So I guess you’re all dying to see the finished result of my denim Thurlow shorts…. Denim being denim stretches/gives over time and unfortunately I didn’t photograph them soon enough so they’ve eased a bit and I probably should’ve worn a belt (which I can, of course, because I added the belt loops!). Personally I find the fabric a bit busy with all those tear holes that make it look like spotty denim, but I love the shade of the blue. Unfortunately I couldn’t find a plain denim in that shade so this is what I got… plus, it only cost me $4 per metre because the fabric was soiled (but it all washed out fine!!) Big smile on my face! :)

denim Thurlow shorts

Notice the plain denim welt pockets?? (made of the selvedge)

And the title of this post is actually relating to another project that I finished today. I made a cowl neck top (McCalls M6078) and I love, love, love it so very much. The neck line is just gorgeous and falls so nicely. The fabric is 95.5% Ray (I presume that is rayon) and 4.5% spandex… it has a lovely weight to it which I think helps with the way it falls. It will be interesting to see how other stretch knits compare with the same pattern.

McCalls M6078

A couple of changes I will make with the next top I make: make it one size smaller, change the hem line to a curve and do the hemming with a walking foot to get a flatter finish. Can’t wait to try it but have to work tomorrow and Friday so probably won’t be able to do this until the weekend. :( Oh, i wish I could sew all day!

Getting there…

Aside

I think I’m on the right track now… I called in to my local fabric store with my pattern in hand and asked one of the girls there to help me.  Done a few minor changes and it’s looking a lot better already.  More soon. :)


Thurlow muslin, take 2

Wow, adding 2cm to the crotch depth has made a world of difference to the rear fit of my shorts and I’m over the moon! See?

BUT, I’m still not happy with the fit at the front. Here is a very rough drawing of what I did to my pattern (sorry, it’s not to scale). You’ll notice that I added an extra centimetre to the centre front as it was a little lower at the front than it was at the back and yes, that portion is balanced now. :)

And here is how the front is looking now. In the photos it doesn’t look as bad as it feels on and I’ve tried a few different alterations but don’t seem to be getting anywhere to perfect the fit. It’s as though it’s not following my curve properly and I don’t know which way to alter it.

Do you see what I mean? **sigh**

Sorry, I was really hoping to be able to post finished projects but have hit a stumbling block and need to somehow get over it… any suggestions?

Note to self…

Next time you make a couture dress and have plans to wear it on a particular day make sure you have a back-up plan ready in case of bad weather!!

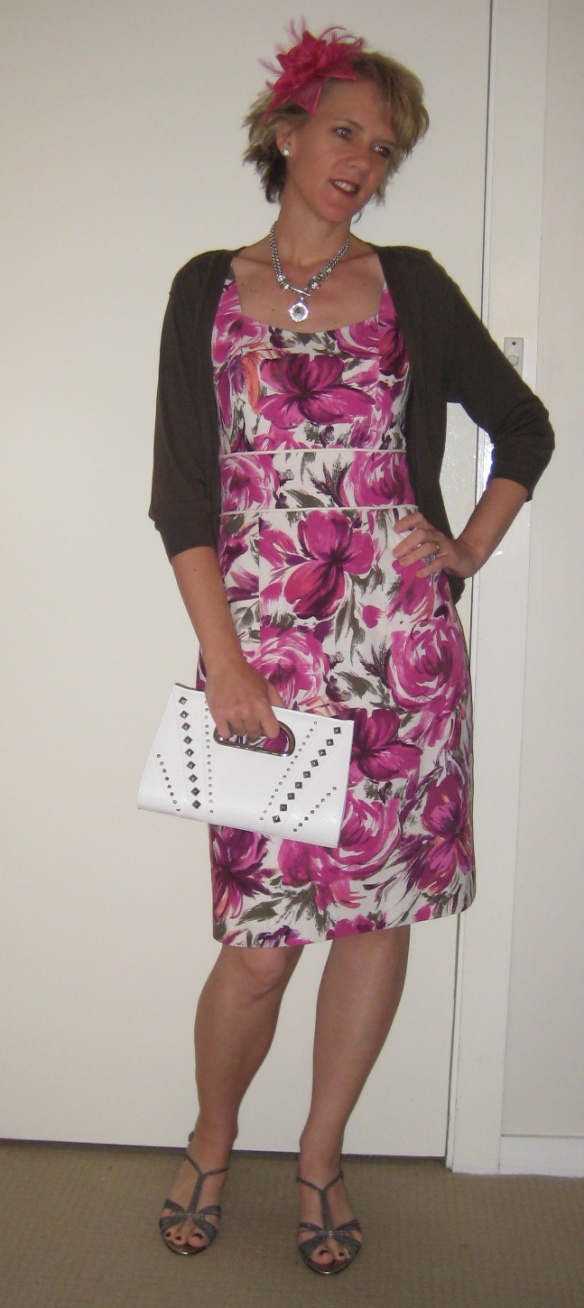
Melbourne Cup Day was today and the weather forecast said cold and rainy! For goodness sake, we’re in Perth, not Melbourne!! Yesterday was so cold and wet with thundery showers and I couldn’t see how I was going to wear my new dress with no sleeves. Tears fell as I had nothing else to wear and no suitable jackets or cardigans to give me extra warmth and I couldn’t just duck out and buy something as I was fasting so the only thing left to do was go door knocking and ask my lovely neighbours (who are all around my own age) if they had anything I could borrow. Hallelujah, Susan from two doors up had a cardigan with the right shade of green that I could get away with. Here’s how I left the house this morning:

Funny enough though, as I climbed into my car at 10:30 the sun came out and it was too hot to wear the cardigan in my car so I removed it. After 20 minutes (still driving at this point) I started to get a headache from the fascinator so that had to go too (I’ve never managed to wear headbands comfortably!). Anyway, enjoyed a lovely afternoon with a 3 course sit down meal, 2 fashion parades (one clothing and the other swimwear) and the whole time I was looking for design ideas that I could use in my year of sewing. Does anyone else do that? LOL I almost can’t stand how judgmental I’ve become now that fit is so important to me!. My horse didn’t come in but it was a fun afternoon.

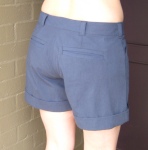
On another note, I finished my Thurlow shorts and love the detail of them but am not happy with the fit of the rear view. The waist and hips are fine and I love the pockets, the fly and the belt loops and I even like the cuffs but I’m so sad that the fit isn’t perfect yet. Never mind, I’ll try again and alter the pattern after researching what the problem is and how to fix it. These shorts are made out of a navy blue bamboo fabric and the pockets are lined with Japanese cotton lawn. Here are the pics:

Gosh, I didn’t think that pants were going to be this hard to fit. Oh, who am I kidding? Of course I knew it would be challenging. Can you see how the fabric is bunching up in the middle of the rear view? Any suggestions?

A job!

Hmmm, I don’t know whether I’m excited about this or not but I just got offered a job which will make me a full-time worker.  Where will I find time to sew?  I’m also going to need to sew at a faster pace coz my work attire leaves a lot to be desired.  Oh, the joy of it all! LOL